Connecting a Shapeoko 3 (GRBL 0.9) to VirtualBox
I recently purchased a Shapeoko 3, and am currently exploring options for my CNC workflow. Being averse to closed-source software like Carbide Create, today I spent some time configuring Universal G-code Sender as an alternative.
For reasons mostly related to Java dependencies, I decided to run Universal G-code Sender on a VirtualBox-based virtual-machine. Configuring the VM turned out to be non-trivial, so I’m documenting the process here. What follows are (a streamlined version of) the steps I took.
1. Create the Virtual-Machine
I used VirtualBox to create a virtual-machine based off of Lubuntu 15.10, and then installed the “VirtualBox 5.0.16 Oracle VM VirtualBox Extension Pack.” (To the best of my understanding, the extension pack is required in order to give VirtualBox access to physical USB devices like the Shapeoko’s serial-port.)That process is straightforward and documented elsewhere, so I won’t bother discussing it here.
2. Configure the Host system
I then made two necessary permission changes on my physical host:sudo usermod -a -G dialout $USER
sudo usermod -a -G vboxusers $USER
Adding $USER to the dialout group gives $USER access to the Shapeoko’s
serial-port.
The second command may not be necessary on your system. My $USER was already
a member of vboxusers. If yours isn’t, be sure to make that change.
I also disabled hibernation on my physical host, in order to keep it from “falling asleep” while the Shapeoko runs long jobs.
Lastly, I rebooted the physical host. (I’m not sure why, but that seemed
necessary in order to have the dialout change respected. I assume there
exists a way around that reboot by restarting some specific service or
something, but I didn’t bother to figure it out.)
3. Configure the Guest system (within VirtualBox)
I then configured VirtualBox to make the Shapeoko’s serial-port available to the guest machine: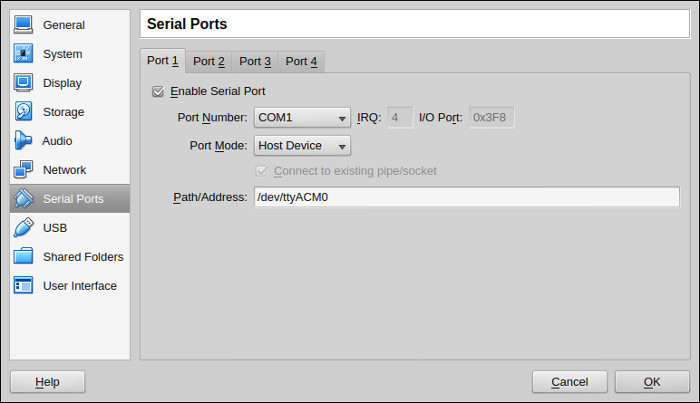
On my physical host, the Shapeoko’s serial-port was mounted by default at
/dev/ttyACM0. As best as I can tell, that is common.
4. Configure the Guest system (within the virtual-machine)
I then booted the virtual-machine and ran the following commands within:#!/bin/bash
# This script configures a Lubuntu 15.10-based virtual machine to use Universal
# G-code sender to communicate with a Shapeoko 3.
# Update the system dependencies
sudo apt-get update && sudo-apt-get upgrade --assume-yes
sudo apt-get autoclean && sudo apt-get autoremove
# Install the required dependencies
sudo apt-get install build-essential --assume-yes
sudo apt-get install curl --assume-yes
sudo apt-get install default-jre --assume-yes
# Download Universal G-code Sender
cd ~ && mkdir bin && cd bin
curl https://github.com/winder/builds/raw/master/UniversalGCodeSender/UniversalGcodeSender-v1.0.9.zip
unzip ./UniversalGcodeSender-v1.0.9.zip
rm start-windows.bat UniversalGcodeSender-v1.0.9.zip
chmod +x start.sh
# Not strictly required, but always useful:
sudo apt-get install git --assume-yes
sudo apt-get install vim-gtk --assume-yes
# add $USER to the `dialout` group to gain read/write on the serial port
sudo usermod -a -G dialout $USER
# reboot the computer
sudo reboot now
This does a few things:
- Updates the system dependencies
- Installs the software packages required by Universal G-code Sender
- Installs Universal G-code Sender to
~/bin - Adds
$USERtodialoutwithin the VM to likewise provide access to the Shapeoko’s serial-port - reboots the machine
After the virtual-machine had rebooted, I disabled hibernation. I also installed the “VirtualBox Guest Additions” for convenience, though doing so is not required.
5. Configure Universal G-code Sender
Next, I configured Universal G-code Sender itself. There were only two required changes:- Specify the serial-port location (mine was at
/dev/ttyS0) - Set the baud-rate to
115200(assuming that your Shapeoko runs GRBL 0.9, which mine did out-of-the-box.)
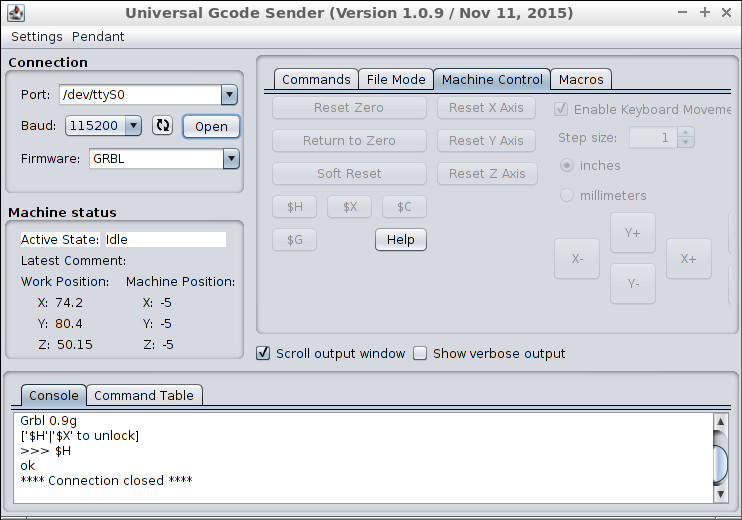
Lastly, I ran ~/bin/start.sh to start Universal G-code Sender, and then
executed a GRBL homing-cycle ($H) to confirm that I had a working machine.